다람쥐메일(squirrelmail) 첨부파일 용량 늘이기

리눅스/Mail|2015. 1. 23. 09:12
반응형

[첨부파일 최대 용량을 10MB로 변경]

다람쥐메일을 sendmail 과 연동시 아래 두개의 파일을 확인해 봅니다.

1) /usr/local/apache/conf/php.ini

post_max_size = 10M
upload_max_filesize = 10M


저장 후, apache 재시작

참고 :  post는 메일내용 + 첨부파일 사이즈
            upload는 첨부파일 사이즈


2) /etc/mail/sendmail.cf

# maximum message size
O MaxMessageSize=10000000

저장 후, sendmail 재시작


반응형

'리눅스 > Mail' 카테고리의 다른 글

qmail 송수신 설정  (0) 2015.01.23
qmail 데몬 죽이기  (0) 2015.01.23
구글메일 사용시 mx레코드 변경  (0) 2015.01.23
sendmail 큐에 쌓인 메일 강제 발송  (0) 2015.01.23
[QMAIL] queue 에 쌓여있는 메일갯수 확인  (0) 2015.01.23

댓글()

구글메일 사용시 mx레코드 변경

리눅스/Mail|2015. 1. 23. 09:12
반응형

zone 파일에 아래항목 추가

@               IN      MX      10       ASPMX.L.GOOGLE.COM.
@               IN      MX      20       ALT1.ASPMX.L.GOOGLE.COM.
@               IN      MX      20       ALT2.ASPMX.L.GOOGLE.COM.
@               IN      MX      30      ASPMX2.GOOGLEMAIL.COM.
@               IN      MX      30      ASPMX3.GOOGLEMAIL.COM.
@               IN      MX      30      ASPMX4.GOOGLEMAIL.COM.
@               IN      MX      30      ASPMX5.GOOGLEMAIL.COM.

반응형

댓글()

sendmail 큐에 쌓인 메일 강제 발송

리눅스/Mail|2015. 1. 23. 09:12
반응형

# sendmail -q -v

반응형

댓글()

[QMAIL] queue 에 쌓여있는 메일갯수 확인

리눅스/Mail|2015. 1. 23. 09:11
반응형

# /var/qmail/bin/qmail-qstat

반응형

댓글()

sendmail 에서 특정 계정으로 오는 메일을 다른 계정으로 받기

리눅스/Mail|2015. 1. 23. 09:10
반응형

sendmail 에서 특정 계정으로 오는 메일을 다른 계정으로 받기


1) /etc/mail/virtusertable 파일을 수정합니다.

설정 내용은 아래와 같이..

root                                       sysdocu           // root 로 오는 메일은 sysdocu 계정으로 포워딩
webmaster@sysdocu.com    sysdocu          // /etc/mail/local-host-names 파일에 여러개의 도메인이 등록되어있을 경우,
admin@sysdocu.com            sysdocu               이렇게 계정에 도메인까지 콕 집어서 메일을 포워딩 할 수 있습니다.


2) 파일 저장 후, 적용합니다.

     # makemap hash /etc/mail/virtusertable < /etc/mail/virtusertable
     # /etc/init.d/sendmail restart


다른 포워딩 방법


사용자 홈디렉토리에 .forward 파일을 만들고 전달받을 주소를 적어줍니다.여러개의 주소를 입력하여 다수의 주소로 포워딩 할 수 있습니다.


# cd /home/sysdocu


# vi .forward

sysdocu@sysdocu.com    // 본래의 수신 주소를 쓰면 사본을 남겨둘 수 있음

sysdocu@hanmail.net

sysdocu@naver.com


# chown sysdocu.sysdocu .forward


반응형

댓글()

sendmail 보내기, 받기 안될때 확인 사항

리눅스/Mail|2015. 1. 23. 09:09
반응형

서버에서 외부로 메일 전송이 되지 않을때 확인.

# vi /etc/mail/local-host-names

sysdocu.com    <- 추가

# vi /etc/mail/sendmail.cf

Cwlocalhost sysdocu.com    <- 수정

# vi /etc/dovecot.conf

protocols = imap imaps pop3 pop3s    <- 수정
listen = [::]    -< 수정

# vi /etc/hosts
127.0.0.1               localhost.localdomain localhost
11.22.33.44          sysdocu.com sysdocu    <- 추가

# vi /etc/sysconfig/network
HOSTNAME=sysdocu.com    <- 수정

# /etc/init.d/network restart
# /etc/init.d/sendmail restart
# /etc/init.d/dovecot restart


외부에서 서버로 메일 전송이 되지 않을때 확인.

# vi /etc/mail/access

Connect:localhost.localdomain       RELAY
Connect:localhost           RELAY
Connect:127.0.0.1           RELAY
Connect:sysdocu.com          RELAY    <- 도메인이 꼭 있어야 함.


반응형

댓글()

다람쥐메일 (squirrelmail) 1.4.13 설치하기

리눅스/Mail|2015. 1. 23. 09:08
반응형

squirrelmail (다람쥐메일) 설치하기

다람쥐 메일에는 imap 기반으로 운영. sendmail 경우에는 xinetd의 imap, dovecot (uw) 부분을 활용하면 된다. 
* qmail 을 사용하는 경우는 대개 courier-imap 을 많이 사용함 ( courier-authlib , courier-imap ) 


### courier-authlib-0.58 설치 ### 
cd /usr/local/src 
wget http://shupp.org/software/courier-authlib-0.58.tar.bz2
tar jvxf courier-authlib-0.58.tar.bz2 
chown -R root.root courier-authlib-0.58
cd courier-authlib-0.58

./configure --prefix=/usr/local/courier-authlib --without-authpam --without-authldap --without-authpwd --without-authmysql --without-authpgsql --without-authshadow --without-authuserdb --without-authcustom --without-authcram --without-authpipe --with-authvchkpw --with-redhat
make
make install 
make install-configure

cp courier-authlib.sysvinit /etc/init.d/courier-authlib
chmod 700 /etc/init.d/courier-authlib
chkconfig --add courier-authlib
/etc/init.d/courier-authlib start


### courier-imap-4.0.6 설치 ### 
cd /usr/local/src 
wget http://shupp.org/software/courier-imap-4.0.6.tar.bz2
tar jvxf courier-imap-4.0.6.tar.bz2 
chown -R root.root courier-imap-4.0.6 
cd courier-imap-4.0.6 

export COURIERAUTHCONFIG=/usr/local/courier-authlib/bin/courierauthconfig 
export CPPFLAGS=-I/usr/local/courier-authlib/include 
./configure --prefix=/usr/local/courier-imap --disable-root-check --with-redhat 

make 
make install 
make install-configure 

vi /usr/local/courier-imap/etc/imapd 

MAXDAEMONS=40 
MAXPERIP=40 
IMAP_EMPTYTRASH=Trash:7,Sent:30 
IMAPDSTART=YES 

cp courier-imap.sysvinit /etc/rc.d/init.d/courier-imap 
chmod 744 /etc/rc.d/init.d/courier-imap 
chkconfig --add courier-imap 
/etc/rc.d/init.d/courier-imap start 


### squirrelamil (다람쥐메일) 설치 ###
cd /usr/local/src 
wget http://www.squirrelmail.org/countdl.php?fileurl=http%3A%2F%2Fprdownloads.sourceforge.net%2Fsquirrelmail%2Fsquirrelmail-1.4.13.tar.gz ===> http://www.squirrelmail.org/download.php (다운페이지) 
cd /usr/local/apache/htdocs 
tar xvzf /usr/local/src/squirrelmail-1.4.13.tar.gz 
chown -R nobody.nobody squirrelmail-1.4.13 
chmod -R 750 squirrelmail-1.4.13 
ln -s squirrelmail-1.4.13 squirrelmail 

mkdir /var/squirrelmail 
mkdir /var/squirrelmail/data 
mkdir /var/squirrelmail/attach 

cd squirrelmail 
cp data/default_pref /var/squirrelmail/data 
chown -R nobody.nobody /var/squirrelmail 
chmod -R 0770 /var/squirrelmail/data 
chmod -R 0730 /var/squirrelmail/attach 

cd config 
./conf.pl 

Main Menu --
1. Organization Preferences 
2. Server Settings 
3. Folder Defaults 
4. General Options 
5. Themes 
6. Address Books 
7. Message of the Day (MOTD) 
8. Plugins 
9. Database 
10. Languages 

D. Set pre-defined settings for specific IMAP servers 

C Turn color on 
S Save data 
Q Quit 

Command >> D 

Please select your IMAP server: 
cyrus = Cyrus IMAP server 
uw = University of Washington's IMAP server (xinetd 의 imap 경우 -> 보통 sendmail에 다람쥐메일설치할경우 선택
exchange = Microsoft Exchange IMAP server 
courier = Courier IMAP server 
macosx = Mac OS X Mailserver 
hmailserver = hMailServer 
quit = Do not change anything 
Command >> courier 


1 ] Organization Preferences 
1. Organization Name : Webmail 
2. Organization Logo : ../images/sm_logo.png 
3. Org. Logo Width/Height : (308/111) 
4. Organization Title : Webmail 
5. Signout Page : 
6. Top Frame : _top 
7. Provider link : http://www.neulwon.com/ 
8. Provider name : neulwon webmail 

R Return to Main Menu 
C Turn color on 
S Save data 
Q Quit 

Command >> 

2 ] Server Settings 

General 
------- 
1. Domain : example.com => ( neulwon.com 으로 수정.) 
2. Invert Time : false 
3. Sendmail or SMTP : SMTP 

A. Update IMAP Settings : localhost:143 (courier) 
B. Update SMTP Settings : localhost:25 

R Return to Main Menu 
C Turn color on 
S Save data 
Q Quit 

Command >> 

3 ] Folder Defaults 

1. Default Folder Prefix : INBOX. 
2. Show Folder Prefix Option : false 
3. Trash Folder : Trash 
4. Sent Folder : Sent 
5. Drafts Folder : Drafts 
6. By default, move to trash : true 
7. By default, move to sent : true 
8. By default, save as draft : true 
9. List Special Folders First : true 
10. Show Special Folders Color : true 
11. Auto Expunge : true 
12. Default Sub. of INBOX : false 
13. Show 'Contain Sub.' Option : false 
14. Default Unseen Notify : 2 
15. Default Unseen Type : 2 -> ( 1-=>2 로 수정) 
16. Auto Create Special Folders : true 
17. Folder Delete Bypasses Trash : true 
18. Enable /NoSelect folder fix : false 

R Return to Main Menu 
C Turn color on 
S Save data 
Q Quit 

4 ] General Options 

1. Data Directory : ../data/ => ( /var/squirrelmail/data/ ) 로 수정 
2. Attachment Directory : $data_dir => ( /var/squirrelmail/attach/) 로 수정 
3. Directory Hash Level : 0 
4. Default Left Size : 150 
5. Usernames in Lowercase : false => ( true ) 로 수정 
6. Allow use of priority : true 
7. Hide SM attributions : false => ( true ) 로 수정 
8. Allow use of receipts : true 
9. Allow editing of identity : true 
Allow editing of name : true 
Remove username from header : false 
10. Allow server thread sort : false 
11. Allow server-side sorting : false 
12. Allow server charset search : true 
13. Enable UID support : true 
14. PHP session name : SQMSESSID 

R Return to Main Menu 
C Turn color on 
S Save data 
Q Quit 

Command >> 


6 ] Address Books 

1. Change LDAP Servers 
2. Use Javascript Address Book Search : fault => ( true ) 로 수정 
3. Global file address book : 
4. Allow writing into global file address book : false 

R Return to Main Menu 
C Turn color on 
S Save data 
Q Quit 

Command >> 

8 ] Plugins 

Installed Plugins 
1. delete_move_next 
2. spamcop 
3. administrator 
4. newmail 
5. abook_take 
6. message_details 
7. info 
8. mail_fetch 
9. translate 
10. listcommands 
11. calendar 
12. bug_report 
13. filters 
14. sent_subfolders 
15. squirrelspell 

Available Plugins: 
16. fortune 

R Return to Main Menu 
C Turn color on 
S Save data 
Q Quit 

10 ] Language preferences 

1. Default Language : en_US => ( ko_KR) 
2. Default Charset : iso-8859-1 => ( EUC-KR ) 
3. Enable lossy encoding : false 

R Return to Main Menu 
C Turn color on 
S Save data 
Q Quit 

Command >> 

cd /usr/local/src 
wget http://www.squirrelmail.org/plugins/quota_usage-1.3.1.tar.gz  (Plugins - Obsolete)
wget http://www.squirrelmail.org/plugins/compatibility-2.0.9.tar.gz  (Plugins - Miscellaneous)

cd /usr/local/apache/htdocs/squirrelmail/plugins 
tar xvzf /usr/local/src/quota_usage-1.3.1.tar.gz 
cp quota_usage/config.php.sample quota_usage/config.php 
chown -R nobody.nobody quota_usage 
chmod -R o-rx quota_usage 

vi quota_usage/functions.php 
Go to line 43 and change the value 1000000 to 1048576 
==> 43 라인 부분에서 1000000 을1048576 으로 수정, 

tar xzf /usr/local/src/compatibility-2.0.9.tar.gz 
chown -R nobody.nobody compatibility 
chmod -R o-rx compatibility 

cd ../config 
./conf.pl 

8 ] Plugins 
부분에서 
quota_usage 
compatibility 을 

-> Installed Plugins 으로 선택하여 올려준다. 

# vi /usr/local/apache/conf/httpd.conf 부분에 webmail 페이지 띄우기 위해 버추얼 호스트 설정. 

<VirtualHost *:80> 
ServerAdmin webmaster@zosen.net 
DocumentRoot /usr/local/apache/htdocs/squirrelmail 
ServerName webmail.zosen.net 
ErrorLog logs/webmail.zosen.net-error_log 
CustomLog logs/webmail.zosen.net-access_log common 
</VirtualHost> 

named 설정에서 서브도메인 'webmail'을 사용할 수 있어야 한다. (예: webmail.neulwon.com)

* 다람쥐메일 한글화 

http://www.squirrelmail.org/download.php 에서 다람쥐메일 설치버전에 맞는 언어팩설치 

cd /usr/local/apache/htdocs/squirrelmail/ 
wget http://heanet.dl.sourceforge.net/sourceforge/squirrelmail/all_locales-1.4.5-20050904.tar.gz 
tar xvzf all_locales-1.4.5-20050904.tar.gz 
cd locale ==> 부분에 ko_KR 이있는지 확인. 

==> http://webmail.도메인

반응형

댓글()

sendmail + dovecot (imap4, pop3) yum 설치

리눅스/Mail|2015. 1. 23. 09:07
반응형

다음 내용은 리눅스 환경에서 sendmail + dovecot (imap, pop3) 서비스 설치 방법에 대해서 설명하고 있다.

이 외에도 여러가지 옵션 및 설정사항들이 있으며, 좀 더 자세한 내용은 다음 홈페이지를 참고해야 한다.


http://www.sendmail.org

http://www.dovecot.org


어디까지나 본 문서는 5분안에 sendmail + dovecot (imap, pop3) 서비스를 설치하는데 있다. !!!!


1. sendmail 설치

sendmail을 설치하기 위해서는 여러가지 라이브러리들이 함깨 설치되어야 하는데, 다음과 같이 yum 명령어를

사용하면 그 모든 작업을 매우 수월하게 진행할 수 있다.

[root@linux ~] yum install sendmail


2. sendmail config 수정

[root@linux ~] vi  /etc/mail/sendmail.cf

/etc/mail/sendmail.cf 파일에 수정해야 할 곳은 딱 한 곳 뿐이다. (현재로서는 .. 2008년 3월 기준)

# SMTP daemon options
O DaemonPortOptions=Port=smtp,Addr=0.0.0.0, Name=MTA


3. sendmail 재시작

[root@linux mail]# service sendmail restart
Shutting down sm-client:                              [  OK  ]
Shutting down sendmail:                              [  OK  ]
Starting sendmail:                                        [  OK  ]
Starting sm-client:                                        [  OK  ]


4. sendmail 테스트

[root@linux mail]# telnet localhost 25
Trying 127.0.0.1...
Connected to localhost.localdomain (127.0.0.1).
Escape character is '^]'.
220 linux.net ESMTP Sendmail 8.13.8/8.13.8; Tue, 11 Mar 2008 17:36:47 -0400


5. dovecot 설치

[root@linux ~] yum install dovecot


6. dovecot config 수정

[root@linux ~] vi  /etc/dovecot.conf

수정해야 할 부분은 딱 두 군데 뿐이다. (protocols, listen)

다음에 표시된 빨간색 protocols, listen을 참고 삼아서 똑 같이 수정한다.

# Protocols we want to be serving: imap imaps pop3 pop3s
# If you only want to use dovecot-auth, you can set this to "none".
protocols = imap imaps pop3 pop3s

# IP or host address where to listen in for connections. It's not currently
# possible to specify multiple addresses. "*" listens in all IPv4 interfaces.
# "[::]" listens in all IPv6 interfaces, but may also listen in all IPv4
# interfaces depending on the operating system.
#
# If you want to specify ports for each service, you will need to configure
# these settings inside the protocol imap/pop3 { ... } section, so you can
# specify different ports for IMAP/POP3. For example:
#   protocol imap {
#     listen = *:10143
#     ssl_listen = *:10943
#     ..
#   }
#   protocol pop3 {
#     listen = *:10100
#     ..
#   }
listen = [::]


7. dovecot 서비스 재시작

[root@linux ~] service dovecot restart
Stopping Dovecot Imap:                                  [  OK  ]
Starting Dovecot Imap:                                    [  OK  ]


8. dovecot imap4 서비스 테스트

[root@linux mail]# telnet localhost 143
Trying 127.0.0.1...
Connected to localhost.localdomain (127.0.0.1).
Escape character is '^]'.
* OK Dovecot ready.


9. dovecot pop3 서비스 테스트

[root@linux mail]# telnet localhost 110
Trying 127.0.0.1...
Connected to localhost.localdomain (127.0.0.1).
Escape character is '^]'.
+OK Dovecot ready.


※ 만약 localhost를 제외한 외부에서 sendmail 혹은 dovecot(imap, pop3)에 텔넷 연결이 되지 않을 경우

    다음 세 가지 사항을 점검해 볼 필요가 있다.

    1. iptables            25번, 110번, 143번 포트가 방화벽에서 허용되고 있는지 유/무

    2. netstat -avp     LISTENINIG 포트 체크

    3. ps -ef | grep sendmail        혹은   ps -ef | grep dovecot


[출처] https://hoguinside.blogspot.com/2014/02/sendmail-dovecot-imap4-pop3-5.html

반응형

댓글()

phpmailer 1.0.x 설치

리눅스/Mail|2015. 1. 23. 09:05
반응형

프로젝트 및 다운로드 사이트 http://sourceforge.net/projects/phpmailer

테이블 작성

* DocumentRoot 디렉토리에 압축파일을 다운받는다

# gzip -d phpmail-1.0.x.tar.gz
# tar xvf phpmail-1.0.x.tar
# cd phpmail-1.0.x


테이블 작성


* 먼저 작성된 mailuser테이블을 삭제한다

# /usr/local/mysql/bin/mysql -u phpmail -p phpmail
mysql> drop table mailuser;
mysql> exit;
# cd sql
# /usr/local/mysql/bin/mysql -u phpmail -p phpmail < phpmail-linux.sql
Enter password:
테이블이 제대로 생성됐는지 확인한다
# /usr/local/mysql/bin/mysql -u phpmail -p phpmail
mysql> show tables;

+-------------------+
| Tables_in_phpmail |
+-------------------+
| mailaddr |
| maildomn |
| mailgrup |
| mailnoti |
| mailpop3 |
| mailpost |
| mailrule |
| mailuser |
+-------------------+
8 rows in set (0.01 sec)

maildomn테이블에 도메인정보를 입력한다
mysql> insert into maildomn values ('메일서버도메인명', '회사명', '관리자아이디', '관리자메일주소', '관리자전화번호', '관리자핸드폰번호', '도메인디스크위치', '도메인당 아이디갯수', '도메인기본제한용량', '등록일자', '사용여부');
sample> insert into maildomn values ('nsets.org', 'phpmail', 'popori', 'popori@kldp.org', '02-2103-xxxx', '017-339-xxxx', '/phpmail/nsets.org', '20', 10240, '2003-04-28', 'Y');


디렉토리 생성


# mkdir -p /phpmail/nsets.org
첨부파일 업로드 디렉토리생성
# mkdir -p /phpmail/nsets.org/.upload
# chown -R nobody:nobody /phpmail


환경설정


# vi DocumentRoot/phpmail-1.0.x/lib/config.lib.html
관리자 메일주소입력
> $phpmail["admin"] = "popori@kldp.org";
편지함의 홈디렉토리 설정
> $phpmail["mhome"] = "/phpmail"; 편지함 홈디렉토리가 NFS일경우 nfs주석을 해제 선택해준다
> $phpmail["mtype"] = "local"; # $phpmail["mtype"] = "remote"; 


접속확인


브라우저를 띄우고 phpmail접속을 확인한다
http://도메인//phpmail-1.0.x

반응형

댓글()

Mulitple Queues

리눅스/Mail|2015. 1. 23. 09:03
반응형

/etc/mail/sendmail.cf 를 열고 QueueDirectory 라는 문자열이 들어 있는 라인을 찾는다. 그리고 아래와 같이 되어 있다면 그냥 넘어 가고 다르다면 아래와 같이 수정을 해 준다.

다음 위의 경로로 이동을 하여 /var/spool/mqueue 에 sub directory가 없다면 q1~q6 까지의 Directory를 만들어 주도록 한다. 그리고 sendmail을 재시작 하면 된다.


[출처] http://blog.naver.com/legendon/140013722592


반응형

댓글()

mod_rewrite 룰 설정에 대한 자세한 설명

리눅스/APACHE|2015. 1. 16. 17:11
반응형

원문 URL: http://httpd.apache.org/docs/2.4/en/rewrite/intro.html#rewriterule


Apache 서버의 .htaccess에 사용되는 URL Rewrite에 대한 자료를 찾다 답답해서 아싸리 그냥 Apache 공식 사이트에 설명된 자료를 퍼와서 번역을 했다. (본 문서의 번역은 의역성이 매우 강하니 혹시라도 이 글을 참고하시는 분은 반드시 이 부분을 감안하여 읽어주시기 바랍니다.) 


Apache mod_rewrite Introduction

아파치 mod_rewrite 소개

This document supplements the mod_rewrite reference documentation. It describes the basic concepts necessary for use of mod_rewrite. Other documents go into greater detail, but this doc should help the beginner get their feet wet.


이 문서는 mod_rewrite 레퍼런스 문서에 대한 보충물이다. 이 문서는 mod_rewrite의 사용에 필요한 기본 개념을 설명한다. 다른 문서들은 보다 세부적인 내용을 다루지만 이 문서는 초보자에게 mode_rewrite에 대한 맛을(?) 볼 수 있게 도와줄 것이다. 


top


Introduction (소개)

The Apache module mod_rewrite is a very powerful and sophisticated module which provides a way to do URL manipulations. With it, you can do nearly all types of URL rewriting that you may need. It is, however, somewhat complex, and may be intimidating to the beginner. There is also a tendency to treat rewrite rules as magic incantation, using them without actually understanding what they do.


아파치 모듈인 mod_rewrite은 URL을 조작(?)할 수 있는 수단을 제공하는 매우 강력하고 섬세한 모듈이다. 이 모듈로 당신이 필요한 거의 모든 타입의 URL rewriting을 할 수 있다. 하지만 이것은 좀 복잡한 편이고 초보자가 처음 다루기에는 부담스러울 수 있다. mod_rewrite가 어떤 일을 하는지에 대한 정확한 이해없이 rewrite 룰을 마치 마법 주문처럼 여기는 경향이 있다.  


This document attempts to give sufficient background so that what follows is understood, rather than just copied blindly.


이 문서는 당신이 그냥 별 생각없이 복사하여 붙여넣기 하기 보다는 이후의 내용을 이해할 수 있게 충분한 백그라운드를 제공하려 한다.  


Remember that many common URL-manipulation tasks don't require the full power and complexity of mod_rewrite. For simple tasks, see mod_alias and the documentation on mapping URLs to the filesystem.


보통 대다수의 URL을 조작하는 일은 mod_rewrite 모듈이 가진 모든 능력과 그 복잡함을 필요료 하지 않는다. (의역: 실제 사용되는 대다수의 URL 조작은 단순한 편이고 그 패턴이 정해져있다.) 단순한 조작에 대한 설명은 mod_alias 와 mapping URLs to the filesystem (파일 시스템에 URL 패핑하기)에 있는 문서를 참고하라. 


Finally, before proceeding, be sure to configure mod_rewrite's log level to one of the trace levels using the LogLevel directive. Although this can give an overwhelming amount of information, it is indispensable in debugging problems with mod_rewrite configuration, since it will tell you exactly how each rule is processed.


먼저 mod_rewrite의 log 레벨을 반드시 LogLevel 지침을 사용하는(사용하여?) trace 레벨 중 하나로 설정하라. 이렇게 하면 비록 어마어마한 양의 로그 정보를 생산할 수 있지만 이렇게 함으로써 정확히 어떤 룰이 실행되는지를 알려주기 때문에 mod_rewrite 설정과 관련된 문제를 디버깅하는데 필수적이라 할 수 있다. 


Regular Expressions (정규 표현식)

mod_rewrite uses the Perl Compatible Regular Expression vocabulary. In this document, we do not attempt to provide a detailed reference to regular expressions. For that, we recommend the PCRE man pages, the Perl regular expression man page, and Mastering Regular Expressions, by Jeffrey Friedl.


mod_rewrite는 Perl Compatible Regular Expression(Perl과 호환하는 정규 표현식) 어휘를 사용한다. 이 문서에서는 정규 표현식과 관련된 디테일한 내용을 다루지 않기 때문에 정규 표현식에 대한 세부내용은 PCRE man pagesPerl regular expression man page, 그리고 Mastering Regular Expressions, by Jeffrey Friedl.을 추천한다. 


In this document, we attempt to provide enough of a regex vocabulary to get you started, without being overwhelming, in the hope that RewriteRules will be scientific formulae, rather than magical incantations.


 RewriteRule이 마법 주문이 아닌 과학적인 공식이라는 것을 알았으면 하는 바램에서 이 문서에서는 당신이 시작하기에 충분한 regex (정규표현식) 어휘들를 제공할 것이다. 


Regex vocabulary (정규표현식 어휘)

The following are the minimal building blocks you will need, in order to write regular expressions and RewriteRules. They certainly do not represent a complete regular expression vocabulary, but they are a good place to start, and should help you read basic regular expressions, as well as write your own.


아래는 당신이 정규 표현식과 RewriteRule을 사용할 수 있는데에 필요한 최소한의 구성 요소이다. 물론 아래의 구성 요소는 정규 표현식의 모든 어휘를 포함하는 것은 절대 아니지만 최소한 당신이 기초적인 정규 표현식을 읽을 수 있고 또한 직접 작성할 수 있게 도와줄 첫 걸음이 될 것이다. 

Character

(문자)

Meaning
(의미)
Example
(예제)
.

Matches any single character
(아무 단일 문자에 상응한다)

c.t will match catcotcut, etc.
(c.t는 cat, cot, cut 등에 상응한다.)  
+Repeats the previous match one or more times
(문자가 한 번 또는 그 이상 상응함을 나타낸다)

a+ matches aaaaaa, etc
(a+는 a, aa, aaa등에 상응한다)
*Repeats the previous match zero or more times.
(문자가 0번 혹은 그 이상 상응함을 나타낸다)

a* matches all the same things a+ matches, but will also match an empty string.
(a*는 a+에 상응하는 모든 문자에 상응하고 또한 빈 문자에도 상응한다)

?Makes the match optional.
(선택적 상응을 나타낸다. 즉, 있어도 되고 없어도 됨)

colou?r will match color and colour.
(colou?r는 color와 colour에 상응한다)
^Called an anchor, matches the beginning of the string
(앵커라고 불리우며 스트링의 시작을 나타낸다)

^a matches a string that begins with a
(^a는 a로 시작하는 스트링에 상응한다)
$The other anchor, this matches the end of the string.
(스트링의 끝을 나타내는 또 다른 앵커)

a$ matches a string that ends with a.
(a$는 a로 끝나는 스트링에 상응한다)
( )

Groups several characters into a single unit, and captures a match for use in a backreference.
(다수의 문자들을 하나의 유닛으로 묶는다. 역참조시 매칭되는 부분을 Substition(대체) 변수에 담긴다.)

(ab)+ matches ababab - that is, the + applies to the group. For more on backreferences see below.
( (ab)+는 ababab에 상응한다. 이 말은 +가 묶음에 적용된다는 뜻이다. backreference에 대한 설명은 아래 참고)
[ ]

A character class - matches one of the characters
(문자 클래스 - 문자들 중 하나에 상응한다. 즉, []안에 있는 문자들 중 하나라도 있으면 상응함)

c[uoa]t matches cutcot or cat.
( c[uoa]t 는 cut, cot, cat에 상응한다)
[^ ]

Negative character class - matches any character not specified
(부정 문자 클래스 - 설정되지 않은 문자에 상응한다. 즉, ^뒤에 지정된 문자가 아니면 상응함)

c[^/]t matches cat or c=t but not c/t
( c[^/]는 cat이나 c=t에 상응하지만 c/t에는 상으하지 않는다)

In mod_rewrite the ! character can be used before a regular expression to negate it. This is, a string will be considered to have matched only if it does not match the rest of the expression.


mod_rewrite에서 ! 문자는 정규식 앞에 사용되면 부인한다는(반대된다는) 의미이다. 즉, 스트링이 정규식에 상응하지 않을 때 정규식 앞에 !을 붙임으로써 상응하게 되게 것이다. 


Regex Back-Reference Availability (정규표현식 Back-Reference[역참조?] 능력)

One important thing here has to be remembered: Whenever you use parentheses in Pattern or in one of the CondPattern, back-references are internally created which can be used with the strings $N and %N (see below). These are available for creating the strings Substitution and TestString as outlined in the following chapters. Figure 1 shows to which locations the back-references are transferred for expansion as well as illustrating the flow of the RewriteRule, RewriteCond matching. In the next chapters, we will be exploring how to use these back-references, so do not fret if it seems a bit alien to you at first.


여기서 반드시 기억해야 할 아주 중요한 사항 한 가지! : Pattern(패턴)이나 CondPattern(조건 패턴?)에서 둥근 괄호를 사용할 때, $N, %N 스트링과 함께 사용될 수 있는 역 참조가 내부적으로 생성이 된다. (아래 참고) 이것은 다음 챕터에 설명되는 Substitution(대체) 스트링과 TestString을 생성할 때 사용될 수 있다. 그림 1은 RewriteRule, RewriteCond 매칭의 흐름에 대해서 묘사하고 있고 또한 확장(expansion)? 을 위해 역 참조가 이동하는 위치를 보여주고 있다. 다음 챕터에서 이 역참조를 사용하는 방법에 대해서 더 배울테니 처음 보고 생소하더라도 쫄지마라. 


Flow of RewriteRule and RewriteCond matching
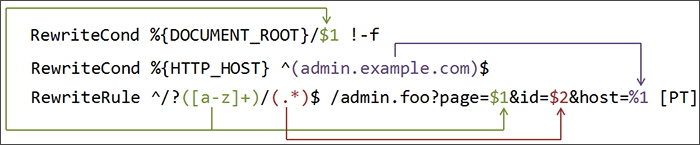
Figure 1: The back-reference flow through a rule.
In this example, a request for /test/1234 would be transformed into /admin.foo?page=test&id=1234&host=admin.example.com.

(그림 1: 룰을 통한 역 참조의 흐름. 이 예제에서는 /test/1234에 대한 리퀘스트가 /admin.foo?page=test&id=1234&host=admin.example.com.으로 변환된다.)


RewriteRule Basics (RewriteRule 기초)

RewriteRule consists of three arguments separated by spaces. The arguments are

RewriteRule은 아래와 같이 공백(스페이스)로 구분되어진 3개의 인자로 구성된다. 

  1. Pattern: which incoming URLs should be affected by the rule;
  2. Substitution: where should the matching requests be sent;
  3. [flags]: options affecting the rewritten request.
1. 패턴: 룰에 의해서 변경되어질 입력 URL
2. 대체: 어떻게 재작성될지에 대한 정의
3. 신호: 재작성된 리퀘스트에 영향을 행사하는 옵션 

The Pattern is a regular expression. It is initially (for the first rewrite rule or until a substitution occurs) matched against the URL-path of the incoming request (the part after the hostname but before any question mark indicating the beginning of a query string) or, in per-directory context, against the request's path relative to the directory for which the rule is defined. Once a substitution has occurred, the rules that follow are matched against the substituted value.


여기서 패턴은 정규표현식이다. 이 정규 표현식은 입력 리퀘스트(hostname 뒤에 오고 쿼리 스트링을 나타내는 물음표는 전에 오는 부분)의 URL 경로에 상응하거나 혹은 디렉토리별 컨텍스트에서 룰 정의가 적용된 디렉토리로 들어오는 리퀘스트의 상대적 경로에 해당한다. 일단 대체가 발생하고 나면, 그 뒤의 룰은 대체된 값에 상응하게 된다. 


Syntax of the RewriteRule directive
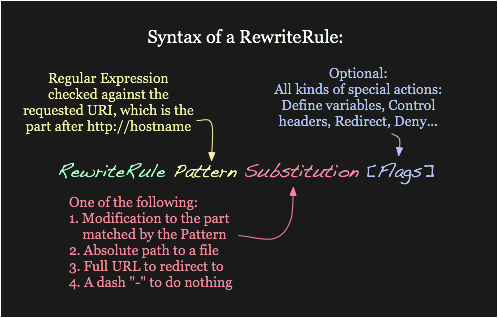
Figure 2: Syntax of the RewriteRule directive.


그림 2: RewriteRule 작성법


The Substitution can itself be one of three things:

Substitution(대체)는 다음 세 개 중 하나가 될 수 있다: 

A full filesystem path to a resource
리소스에 대한 완전한(full) 파일 시스템 경로
RewriteRule ^/games /usr/local/games/web

This maps a request to an arbitrary location on your filesystem, much like the Alias directive.


이것은 리퀘스트(^/games 형식의 정규식. 즉, http://hostname/games 형식임)를 파일시스템에서 임의의 위치로 (여기서는 "/usr/local/games/web"  매핑한다. Alias 명령이랑 매우 유사하다. 

A web-path to a resource
리소스에 대한 웹 경로
RewriteRule ^/foo$ /bar

If DocumentRoot is set to /usr/local/apache2/htdocs, then this directive would map requests for http://example.com/foo to the path/usr/local/apache2/htdocs/bar.


만약 DocumentRoot 가 /usr/local/apache2/htdocs로 설정되었다면 이 명령은 http://example.com/foo으로 들어오는 리퀘스트를 으/usr/local/apache2/htdocs/bar로 매핑한다. 

An absolute URL
절대 URL
RewriteRule ^/product/view$ http://site2.example.com/seeproduct.html [R]

This tells the client to make a new request for the specified URL.


이 명령은 클라이언트에게 지정된 URL로 새로운 리퀘스트를 보내라고 통보한다. 

The Substitution can also contain back-references to parts of the incoming URL-path matched by the Pattern. Consider the following:


Substitution(대체)는 Pattern(패턴)에 매칭되는 입력 URL 경로의 부분에 대한 역 참조를 포함할 수 있다. 

RewriteRule ^/product/(.*)/view$ /var/web/productdb/$1

The variable $1 will be replaced with whatever text was matched by the expression inside the parenthesis in the Pattern. For example, a request for http://example.com/product/r14df/view will be mapped to the path /var/web/productdb/r14df.


$1 변수는 패턴의 괄호 안의 정규식에 매칭되는 텍스트로 교체된다.  예를 들어, http://example.com/product/r14df/view에 대한 리퀘스트는 /var/web/productdb/r14df.의 경로로 매핑된다. 


If there is more than one expression in parenthesis, they are available in order in the variables $1$2$3, and so on.


만약 괄호안에 하나 두 개 이상의 정규식이 존재한다면 이들은 $1$2$3.. 형식으로 사용 가능하다. 


top

Rewrite Flags (Rewrite 신호)

The behavior of a RewriteRule can be modified by the application of one or more flags to the end of the rule. For example, the matching behavior of a rule can be made case-insensitive by the application of the [NC] flag:


룰 끝에 하나 혹은 그 이상의 신호를 추가함으로써 RewriteRule의 작동 방식을 수정할 수 있다. 예를 들어, 룰의 매칭 방식을 [NC] 신호를 사용하여 대소문자 구분을 안 하게 할 수 있다. (NC는 Non Case-sensitive의 약자인듯)

RewriteRule ^puppy.html smalldog.html [NC]

For more details on the available flags, their meanings, and examples, see the Rewrite Flags document.


신호에 대한 좀 더 구체적인 정보와 예제는 Rewrite Flags 문서를 참고하라.  


top

Rewrite Conditions (Rewrite 조건)

One or more RewriteCond directives can be used to restrict the types of requests that will be subject to the following RewriteRule. The first argument is a variable describing a characteristic of the request, the second argument is a regular expression that must match the variable, and a third optional argument is a list of flags that modify how the match is evaluated.


하나 혹은 그 이상의 RewriteCond 명령은 이 명령 다음에 오는 RewriteRule에 대한 리퀘스트 타입을 제한하는데 사용될 수 있다. 첫번째 인자는 리퀘스트의 특징을 묘사하는 변수이고, 두번째 인자는 이 변수에 매칭되어야 하는 정규표현식이다. 그리고 세번째 인자(선택사항임)는 매칭이 어떻게 처리되어야 하는지에 대해 수정하는 신호 목록이다.(?)

Syntax of the RewriteCond directive
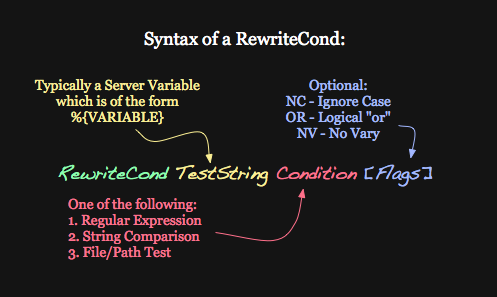
Figure 3: Syntax of the RewriteCond directive


그림 3: RewriteCond 명령의 작성법

For example, to send all requests from a particular IP range to a different server, you could use:


예를 들어, 특정 IP 영역대에서 들어오는 모든 리퀘스트들을 다른 서버로 보내고 싶다면 아래와 같이 할 수 있다: 

RewriteCond %{REMOTE_ADDR} ^10\.2\.
RewriteRule (.*) http://intranet.example.com$1

When more than one RewriteCond is specified, they must all match for the RewriteRule to be applied. For example, to deny requests that contain the word "hack" in their query string, unless they also contain a cookie containing the word "go", you could use:


RewriteCond이 두 개 이상 선언됐을때, 이들은 모두 RewriteRule에 매칭되어야 한다. 예를 들어, 쿼리 스트링에 "hack"이라는 단어를 포함한 리퀘스트들을 거부하려면 ("go"라는 단어를 포함하는 쿠키를 포함하지 않는 이상) 아래와 같이 할 수 있다. 

RewriteCond %{QUERY_STRING} hack
RewriteCond %{HTTP_COOKIE} !go
RewriteRule . - [F]

Notice that the exclamation mark specifies a negative match, so the rule is only applied if the cookie does not contain "go".


느낌표는 부정을 의미하기 때문에 여기서는 쿠키가 "go"를 포함하지 않을 때에만 룰이 적용된다. 


Matches in the regular expressions contained in the RewriteConds can be used as part of the Substitution in the RewriteRule using the variables %1%2, etc. For example, this will direct the request to a different directory depending on the hostname used to access the site:


RewriteConds 에 포함된 정규식에 대한 매칭은 RewriteRule 에서 %1%2,.. 변수를 이용하여 대체구문(Substitution)의 부분으로 사용될 수 있다. 예를 들어, 아래는 사이트 접속에 사용된 hostname에 따라 다른 디렉토리로 리퀘스트를 보낸다. 

RewriteCond %{HTTP_HOST} (.*)
RewriteRule ^/(.*) /sites/%1/$1

If the request was for http://example.com/foo/bar, then %1 would contain example.com and $1 would contain foo/bar.


만약 리퀘스트가 http://example.com/foo/bar 이라면 %1는 example.com이 되고 $1는 foo/bar가 된다. 


top

Rewrite maps (Rewrite 매핑)

The RewriteMap directive provides a way to call an external function, so to speak, to do your rewriting for you. This is discussed in greater detail in the RewriteMap supplementary documentation.


RewriteMap  명령은 rewriting을 해주는 외부 함수를 호출할 수 있는 수단을 제공한다. 세부내용은 RewriteMap supplementary documentation. 참고하기 바란다. 


top

.htaccess files (.htaccess 파일)

Rewriting is typically configured in the main server configuration setting (outside any <Directory> section) or inside <VirtualHost> containers. This is the easiest way to do rewriting and is recommended. It is possible, however, to do rewriting inside <Directory> sections or .htaccess files at the expense of some additional complexity. This technique is called per-directory rewrites.


Rewriting은 보통 메인 서버 구성 설정(<Directory> 섹셕 밖 아무데나)이나  <VirtualHost> 컨테이너에 구성이 된다. 이 방법은 가장 쉬운 방법이고 또한 권장사항이기도 하다. 그러나 약간 복잡하긴 하지만 <Directory>  섹션 안에 혹은 .htaccess 파일에 rewriting이 가능하다. 이 기술은 "디렉토리별 rewrite" (per-directory rewrites)라 불린다. 


The main difference with per-server rewrites is that the path prefix of the directory containing the .htaccess file is stripped before matching in the RewriteRule. In addition, the RewriteBase should be used to assure the request is properly mapped.


디렉토리별 rewrite를 사용했을 때의 가장 다른 점은 .htaccess 파일을 포함하는 디렉토리에 대한 경로 prefix가 RewriteRule에서 매칭되기 전에 제거가 된다는 것이다. 또한, 리퀘스트가 올바르게 매핑되었다는 것을 확실히 하기 위해  RewriteBase가 사용되어야 한다.  


[출처] 파노카페 (http://panocafe.tistory.com/708)

반응형

댓글()