스토리지 상태를 점검하기 위한 API 데몬 만들기
내용을 보시려면 비밀번호를 입력하세요.
압축된(minified) CSS 파일은 한 줄로만 되어 있어 사람이 읽기 불편합니다.
이럴 때 cssbeautifier 도구를 사용하면 손쉽게 들여쓰기와 줄바꿈이 적용된 CSS 코드로 변환할 수 있습니다.
pip가 없다면 설치합니다.
# apt -y install python3-pip
그 다음 cssbeautifier 패키지를 설치합니다.
# pip install cssbeautifier
이제 준비된 CSS 파일을 표준 입력/출력 방식을 활용하여 사람이 읽기 편한 개행과 들여쓰기 처리를 합니다.
압축된 CSS 파일을 cat으로 읽어서 css-beautify에 전달하고, 결과를 새로운 파일로 저장하는 방법입니다.
# cat difficult.css | css-beautify > easy.css
이렇게 하면 difficult.css 파일이 보기 좋은 형태로 포맷팅되어 easy.css 파일에 저장됩니다.
| AMD Radeon AI PRO R9700 두 장으로 vLLM 구동하기 (0) | 2026.01.05 |
|---|---|
| vi 에디터 기본 환경 설정 (0) | 2025.06.25 |
| wkhtmltopdf로 HTML 웹페이지 또는 웹문서를 PDF로 변환하기 (0) | 2025.06.12 |
| watchdog 설정으로 시스템 다운시 재부팅하기 (0) | 2025.06.11 |
| Ubuntu 24.04 에서 RTX5080 드라이버 설치하기 (0) | 2025.04.11 |
현재 계정의 디렉토리에 .vimrc 파일을 생성하고 설정값을 저장만 하면 됩니다.
기본 설정이 안되어 있으면 새로운 파일을 편집하게 됩니다.
" 표시는 주석입니다.
# vi ~/.vimrc
| " 검색 관련 설정 set hlsearch " 검색 결과 하이라이트 set incsearch " 실시간 검색 set ignorecase " 대소문자 무시 set smartcase " 스마트 대소문자 " 검색 하이라이트 색상 (노란 배경, 검은 글씨) highlight Search ctermbg=yellow ctermfg=black guibg=yellow guifg=black " 현재 검색 결과 색상 (빨간 배경, 흰 글씨) highlight IncSearch ctermbg=red ctermfg=white guibg=red guifg=white " 줄 번호 표시 "set number " 구문 강조 syntax on |
이제 vi 에디터를 사용하면 설정된 값이 적용되어 열리게 됩니다.
| AMD Radeon AI PRO R9700 두 장으로 vLLM 구동하기 (0) | 2026.01.05 |
|---|---|
| CSS Beautify 설치 및 사용법 (0) | 2025.08.19 |
| wkhtmltopdf로 HTML 웹페이지 또는 웹문서를 PDF로 변환하기 (0) | 2025.06.12 |
| watchdog 설정으로 시스템 다운시 재부팅하기 (0) | 2025.06.11 |
| Ubuntu 24.04 에서 RTX5080 드라이버 설치하기 (0) | 2025.04.11 |
아래 페이지에가면 시스템 및 버전별 패키지를 배포하는데, 여기에서는 Ubuntu 24.04 시스템을 기준으로 설명드립니다.
https://wkhtmltopdf.org/downloads.html
Ubuntu 24.04 라 하더라도 최근에 나오는 버전은 없기때문에 Ubuntu 22.04 패키지를 다운로드해서 설치해야 합니다.
1. 다운로드 및 설치
# wget https://github.com/wkhtmltopdf/packaging/releases/download/0.12.6.1-2/wkhtmltox_0.12.6.1-2.jammy_amd64.deb
# dpkg -i wkhtmltox_0.12.6.1-2.jammy_amd64.deb
설치도중 추가 패키지 설치 내용이 나오면 아래 패키지도 같이 설치해 주세요.
# apt install -y xfonts-75dpi xfonts-base
한글 사용을 위해 무료폰트를 설치합니다.
# apt -y install fonts-nanum
# apt -y install fonts-noto-cjk fonts-unfonts-core
2. 사용방법
로컬의 파일 또는 웹사이트를 pdf 로 변환할 수 있습니다.
# wkhtmltopdf --encoding UTF-8 --enable-local-file-access report.html report.pdf
# wkhtmltopdf http://www.sysdocu.kr/text.html text.pdf
| CSS Beautify 설치 및 사용법 (0) | 2025.08.19 |
|---|---|
| vi 에디터 기본 환경 설정 (0) | 2025.06.25 |
| watchdog 설정으로 시스템 다운시 재부팅하기 (0) | 2025.06.11 |
| Ubuntu 24.04 에서 RTX5080 드라이버 설치하기 (0) | 2025.04.11 |
| Tomcat9에서 사용하던 war파일 Tomcat10에서 배포하기 (Gaucamole 1.6.0) (0) | 2025.03.17 |
watchdog 명령은 시스템을 주기적으로 감시하고, 문제가 감지되었을 때 자동으로 재부팅하도록 도와주는 데몬 프로그램입니다.
시스템이 멈추거나 심각한 장애 상태에 빠졌을 때 자동으로 복구되도록 하기 위해 사용됩니다.
# dnf -y install watchdog // RockyLinux 에서
# apt -y install watchdog // Ubuntu 에서
# systemctl enable watchdog
여기에서는 시스템이 행(Hang) 걸릴때 네트워크 연결이 안된다는 것을 이용해 '네트워크 연결 실패시 리부팅' 이라는 조건을 설정하였습니다.
하지만 행 걸린 시점에서 watchdog 이 제대로 동작할지는 모르겠네요...
# vi /etc/watchdog.conf
| # 모든 ping 대상에 실패할 경우에만 재부팅을 트리거합니다. # 5번 연속 실패해야 다운으로 간주 ping = 192.168.10.1 ping = 192.168.10.2 ping-count = 60 # 60초 동안 syslog 파일이 업데이트되지 않으면 재부팅 시도 change = /var/log/syslog 60 # 1분 평균 부하가 24를 초과하면 재부팅 max-load-1 = 24 # 이는 시스템이 매우 바쁘거나 멈추려고 할 때 watchdog이 확실하게 작동하도록 돕습니다. # 1 (가장 높은 우선순위) ~ 99 (가장 낮은 우선순위) realtime = yes priority = 1 |
# systemctl restart watchdog
이제 네트워크 연결이 1분간 체크되지 않으면 시스템이 자동 리부팅 됩니다.
별도의 파일에 기록하도록 옵션 설정을 하지 않았으므로, 로그는 /var/log/messages 에 기록됩니다.
| vi 에디터 기본 환경 설정 (0) | 2025.06.25 |
|---|---|
| wkhtmltopdf로 HTML 웹페이지 또는 웹문서를 PDF로 변환하기 (0) | 2025.06.12 |
| Ubuntu 24.04 에서 RTX5080 드라이버 설치하기 (0) | 2025.04.11 |
| Tomcat9에서 사용하던 war파일 Tomcat10에서 배포하기 (Gaucamole 1.6.0) (0) | 2025.03.17 |
| RockyLinux 9 에서 root 원격접속 허용하기 (0) | 2025.03.14 |

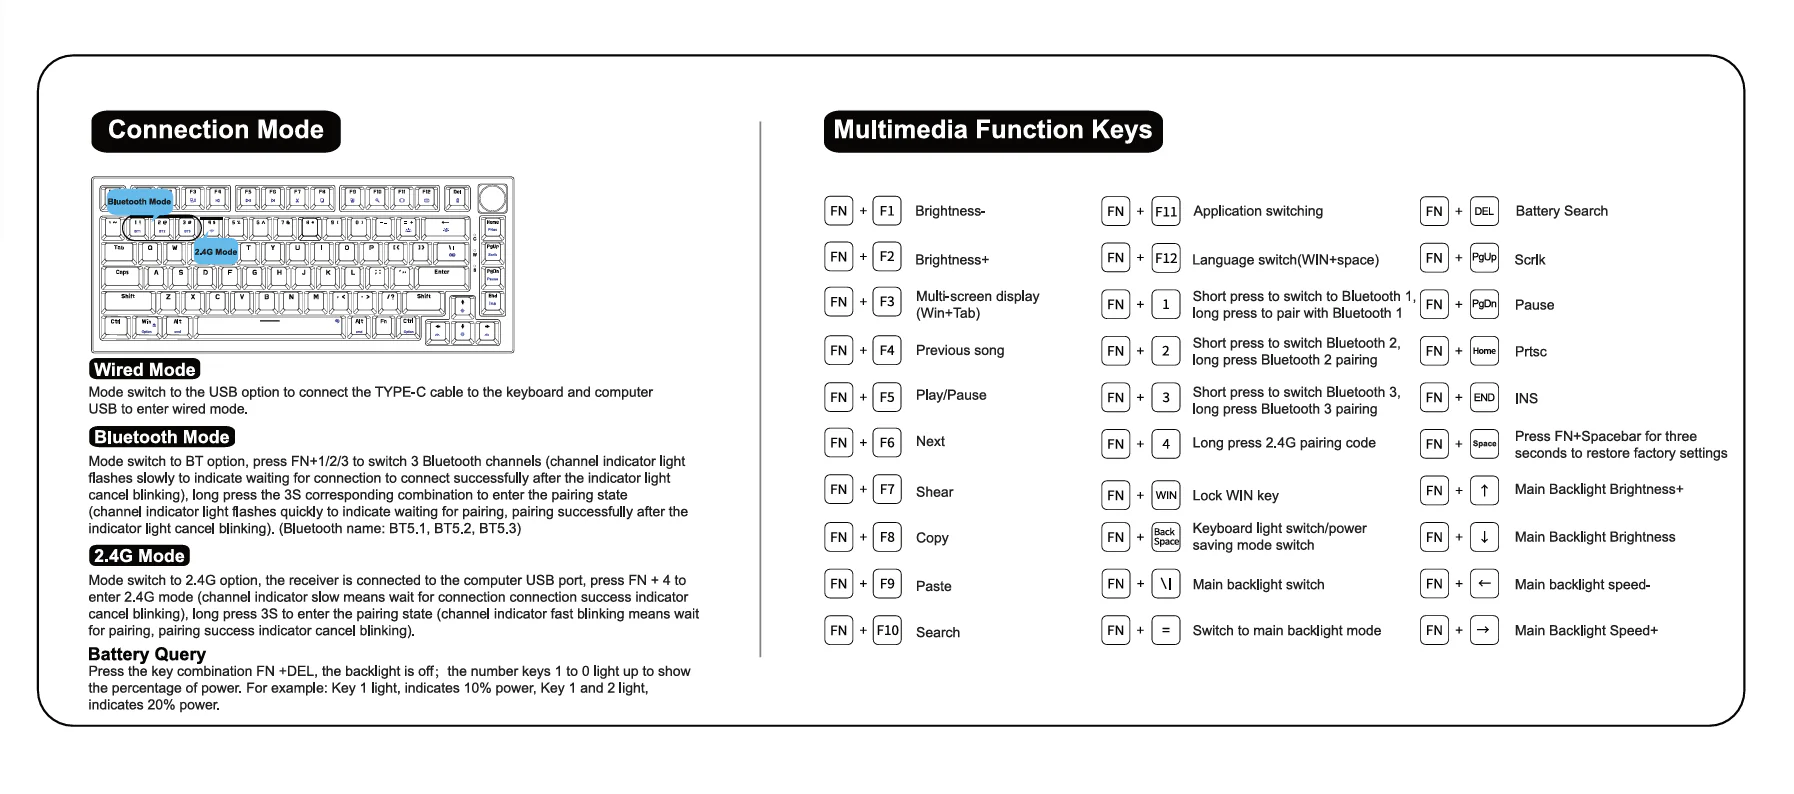
백라이트 모드 변경 : [FN] + \
| [리눅스] png 이미지를 jpg 로 변환하기 (반대 포함) (0) | 2022.06.23 |
|---|---|
| [리눅스] PDF 파일 여러개를 하나로 합치기 (0) | 2022.06.23 |
| TTS 를 이용한 음성 (wav) 다운로드 및 mp3 변환 사이트 (0) | 2020.10.26 |
| Advanced BAT to EXE Converter v4.11c (06/14/2020) (0) | 2020.06.15 |
| Bat to Exe Converter V.3.0.7 (2018-01-26) (0) | 2020.06.15 |
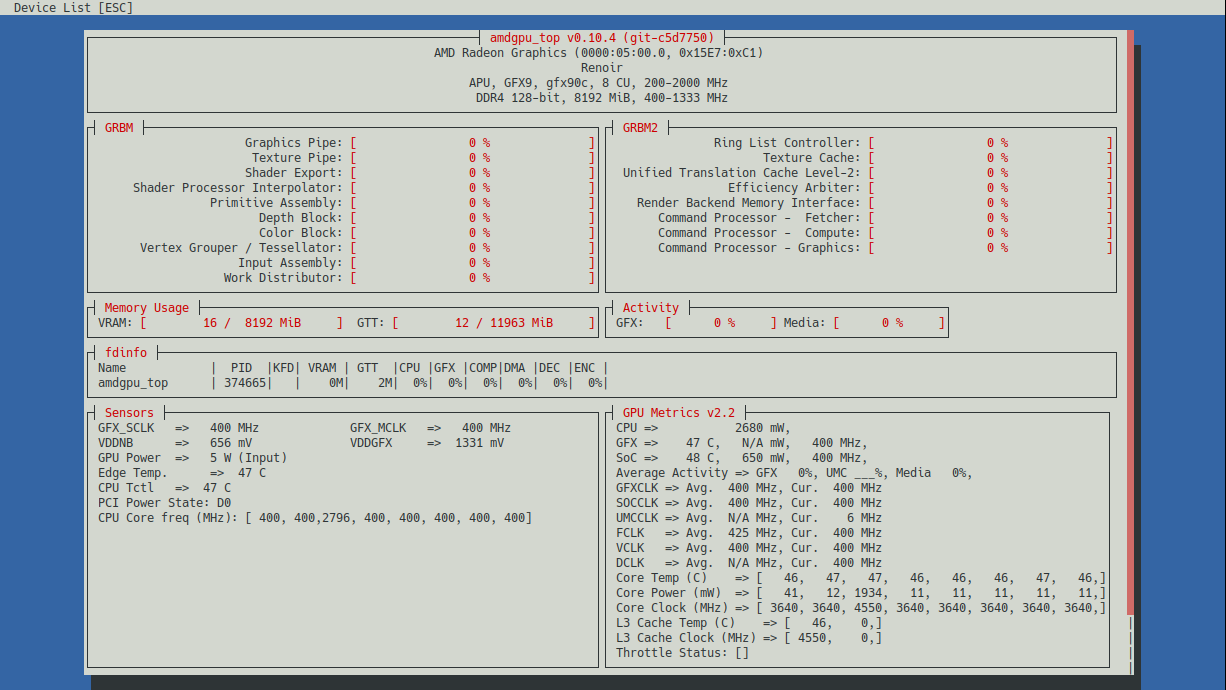
GPU 모니터링 도구는 몇가지 있지만 그 중에 더 많은 정보를 실시간으로 출력해주는 도구가 있어 소개합니다.
amdgpu_top은 AMD GPU의 사용률, 온도, 메모리 사용량 등을 실시간으로 확인할 수 있는 TUI 기반 도구입니다.
필자는 Ubuntu 24.04에서 AMD Radeon RX Vega 8을 정상적으로 사용하기 위해 아래 절차로 진행하였습니다.
1. 드라이버 설치
AMD 공식 사이트에서 Ubuntu 24.04용 드라이버를 다운로드합니다.
# wget https://repo.radeon.com/amdgpu-install/6.3.2/ubuntu/noble/amdgpu-install_6.3.60302-1_all.deb
패키지 리스트를 업데이트 하고, 설치 작업을 계속 진행합니다.
# apt update && apt -y upgrade
# apt -y install "linux-headers-$(uname -r)" "linux-modules-extra-$(uname -r)"
# apt -y install python3-setuptools python3-wheel
# usermod -a -G render,video $LOGNAME
# wget https://repo.radeon.com/amdgpu-install/6.3.2/ubuntu/noble/amdgpu-install_6.3.60302-1_all.deb
# apt -y install amdgpu-install_6.3.60302-1_all.deb
# apt update
# apt -y install amdgpu-dkms rocm
# amdgpu-install -y --usecase=graphics
이후 리부팅을 해야 적용됩니다.
# reboot
2. amdgpu_top 설치
# git clone https://github.com/Umio-Yasuno/amdgpu_top.git
# cd amdgpu_top
# apt -y install cargo rustup
# rustup install nightly
# rustup default nightly
# cargo build --release
amdgpu_top 명령을 실행하여 모니터링을 시작합니다.
# ./target/release/amdgpu_top

| NGC(NVIDIA GPU Cloud)에서 Ollama 설치 및 모델 구동하기 (0) | 2025.08.13 |
|---|---|
| LLM 파일 형식 변환하기 (Safetensors to GGUF) (0) | 2025.04.28 |
| Ubuntu 24.04 에서 BitNet 1-bit LLM 설치 및 사용하기 (0) | 2025.04.23 |
| Intel Xeon 4510 x 2 CPU + DDR5 1TB + RTX4090 (or RTX5080) 장비에서 Ktransformers + Deepseek-R1:671B 설치하기 (0) | 2025.04.17 |
| Ubuntu 24.04 에서 그래픽카드 (GPU) 선택적 비활성화 하기 (0) | 2025.04.14 |
huggingface_cli 또는 vllm 명령으로 다운로드 받은 Safetensors 형식의 LLM을 ollama 에서 사용하기 위해 GGUF 파일 형식으로 변환하는 작업입니다.
여기에서는 Gemma2:9b 모델을 예로 들었습니다.
1. HuggingFace LLM 다운로드
huggingface_hub 패키지를 설치하고 LLM 다운로드를 위한 파이썬 스크립트를 작성합니다.
(myenv) root@sysdocu:~# pip install huggingface_hub
(myenv) root@sysdocu:~# vi download.py
from huggingface_hub import snapshot_download
model_id= "unsloth/gemma-2-9b-it"
snapshot_download(repo_id=model_id, local_dir="downllm", local_dir_use_symlinks=False, revision="main")
작성한 파이썬 코드를 실행하여 LLM을 다운로드 합니다.
(myenv) root@sysdocu:~# python download.py
2. GGUF 형식 모델 생성
모델을 Safetensors 형식에서 GGUF 형식으로 변환하기 위한 환경을 구성합니다.
(myenv) root@sysdocu:~# git clone https://github.com/ggerganov/llama.cpp.git
(myenv) root@sysdocu:~# pip install -r llama.cpp/requirements.txt
(myenv) root@sysdocu:~# python llama.cpp/convert_hf_to_gguf.py downllm/ --outfile gemma2-9b.gguf
3. Ollama 모델 추가
Modelfile에 GGUL 모델을 지정하고 ollama 명령으로 모델을 생성합니다.
(myenv) root@sysdocu:~# echo "from ./gemma2-9b.gguf" > Modelfile
(myenv) root@sysdocu:~# ollama create gemma2:9b -f Modelfile
(myenv) root@sysdocu:~# ollama list
NAME ID SIZE MODIFIED
gemma2:9b2 26e0cfb6b65 18 GB 2 seconds ago
생성된 모델이 잘 실행됩니다.
(myenv) root@sysdocu:~# ollama run gemma2:9b "hello?"
Hello! 👋 How can I help you today? 😊
| NGC(NVIDIA GPU Cloud)에서 Ollama 설치 및 모델 구동하기 (0) | 2025.08.13 |
|---|---|
| AMD GPU 리소스 모니터링 (amdgpu_top) 설치하기 (0) | 2025.04.29 |
| Ubuntu 24.04 에서 BitNet 1-bit LLM 설치 및 사용하기 (0) | 2025.04.23 |
| Intel Xeon 4510 x 2 CPU + DDR5 1TB + RTX4090 (or RTX5080) 장비에서 Ktransformers + Deepseek-R1:671B 설치하기 (0) | 2025.04.17 |
| Ubuntu 24.04 에서 그래픽카드 (GPU) 선택적 비활성화 하기 (0) | 2025.04.14 |
최근 AI 자체 구현에 대한 관심도가 높아져 LLM 도 짧은 시간내에 많은 발전이 있었는데, 그중 눈에 띄는 하나가 Microsoft 사에서 만든 BitNet 1-bit LLM(BitNet-b1.58-2B-4T / 24억개 파라미터) 모델입니다. 지금까지의 LLM 은 고성능 GPU 를 필요로 했는데, 이 모델은 저사양의 CPU, Memory 로도 구동이 가능하다는 보여주고 있습니다. 이제 LLM을 스마트폰이나 엣지 디바이스, 사물인터넷(IoT)과 같은 온디바이스 환경에서도 구동할 날이 머지않은 것 같습니다.
[특징]
- 1.58bit의 정보량을 갖습니다. 이는 전통적인 16비트 또는 32비트 모델에 비해 메모리 사용량을 크게 줄입니다.
- BitNet b1.58은 동일한 크기의 full-precision 모델(FP16 또는 BF16)과 비교하여 최종 작업 성능에서 유사한 결과를 보입니다.
- 메모리 사용량과 에너지 소비를 크게 줄이며, 특히 추론 시간과 처리량 측면에서 높은 효율성을 제공합니다.
- 기존 Transformer와 유사한 스케일링 법칙을 따르며, 대규모 모델로의 확장이 가능합니다.
- CPU에서의 빠르고 손실 없는 추론을 지원하는 공식 추론 프레임워크로, ARM 및 x86 아키텍처를 지원합니다.
[단점]
- 한글이 완전하지 않습니다. (탈자 및 영어 혼용)
- 문장 이해력이 부족합니다.
아직은 안정성과 실사용 적합성이 충분히 검증되지 않았기 때문에 많은 테스트를 거치며 눈여겨 볼 필요가 있습니다.
아래 설치 및 사용 과정은 Ubuntu 24.04 를 기준으로 작성하였습니다.
1. 환경 설정
[필수 요구 사항]
- python >= 3.9
- cmake >= 3.22
- clang >= 18
자동 설치 스크립트를 사용하여 필요한 패키지를 다운로드할 수 있습니다.
# apt update && apt -y upgrade
# bash -c "$(wget -O - https://apt.llvm.org/llvm.sh)"
다른 사용자와 환경이 충돌되지 않도록 conda 사용을 추천합니다.
# apt -y install build-essential cmake ninja-build
# wget https://repo.anaconda.com/archive/Anaconda3-2024.10-1-Linux-x86_64.sh
# sh Anaconda3-2024.10-1-Linux-x86_64.sh
라이선스 동의 → yes
설치 경로 지정 → 기본값 (Enter)
설치 완료 후 conda init 실행 여부 → yes
# source ~/.bashrc
# conda --version
2. 소스를 통한 빌드
BitNet 을 다운로드 합니다.
# git clone --recursive https://github.com/microsoft/BitNet.git
# cd BitNet
새로운 conda 가상환경을 생성하고 필요한 패키지를 설치합니다.
# conda create -n bitnet-cpp python=3.11
Proceed ([y]/n)? → y
# conda activate bitnet-cpp
# pip install -r requirements.txt
모델을 수동으로 다운로드하고 로컬 경로에서 실행합니다.
# huggingface-cli download microsoft/BitNet-b1.58-2B-4T-gguf --local-dir models/BitNet-b1.58-2B-4T
# python setup_env.py -md models/BitNet-b1.58-2B-4T -q i2_s
3. 사용하기
아직은 한글이 완전히 지원되지 않으므로, 한글로 질문할 경우 글자가 빠지거나, 반복적인 답변 또는 영어와 혼용된 답변을 얻게 됩니다.
아래와 같이 모델을 시작합니다.
(리소스 자원 사용량 : CPU 평균 1 이하, Memory 약 230MB)
# python run_inference.py -m models/BitNet-b1.58-2B-4T/ggml-model-i2_s.gguf -p "You are a helpful assistant" -cnv
...
...
(생략)
...
...
System: You are a helpful assistant
> Write a funny story in 5 sentences.
One day, a lazy cat named Whiskers decided to play hide-and-seek in the living room. As the game went on, Whiskers began hiding behind every possible hiding spot, including the sofa cushions, the curtains, and even the refrigerator. The owner of the house, a young boy named Timmy, had never seen a cat so good at hiding before. After an hour of searching, Timmy finally found Whiskers, curled up in the middle of the living room. The cat, tired and content, looked at Timmy and
> keep going
Timmy, with a look of confusion, asked, "Whiskers, how did you get here?" Whiskers, not missing a beat, replied, "I'm a good cat, Timmy. I just know how to hide really well." Timmy, still puzzled, replied, "Well, I'm still not sure I believe you!" Whiskers then looked up at Timmy with a mischievous grin and said, "I think it's time for your weekly checkup." Timmy, now even more confused, asked, "What are you talking about?"
>
| AMD GPU 리소스 모니터링 (amdgpu_top) 설치하기 (0) | 2025.04.29 |
|---|---|
| LLM 파일 형식 변환하기 (Safetensors to GGUF) (0) | 2025.04.28 |
| Intel Xeon 4510 x 2 CPU + DDR5 1TB + RTX4090 (or RTX5080) 장비에서 Ktransformers + Deepseek-R1:671B 설치하기 (0) | 2025.04.17 |
| Ubuntu 24.04 에서 그래픽카드 (GPU) 선택적 비활성화 하기 (0) | 2025.04.14 |
| GGUF 파일을 Llama.cpp 도구로 실행하는 방법 (0) | 2025.04.14 |