특정 파일이 소속된 rpm 패키지 찾기

리눅스/APACHE|2017. 3. 6. 11:20
반응형

특정 파일이 어떤 rpm 패키지에 소속 되어 있는지 찾고 싶을 때


예를 들어, df 라는 명령어(파일)가 어떤 패키지에 포함 되어 있는지 알고 싶다면,


1. 우선 df의 경로를 알아낸 뒤

[root@localhost ~]# which df
/bin/df

2. rpm -qf 명령으로 해당 파일의 경로를 적어 준다

[root@localhost ~]# rpm -qf /bin/df
coreutils-5.97-34.el5_8.1


[출처] http://faq.hostway.co.kr/Linux_ETC/4416

반응형

댓글()

Ubuntu 16.04 IPTABLES 사용법

리눅스/Network|2017. 2. 14. 08:28
반응형

http://linux-sys-adm.com/ubuntu-16.04-lts-how-to-configure-firewall-iptables-fail2ban/


테스트 환경 : Ubuntu 16.04 LTS

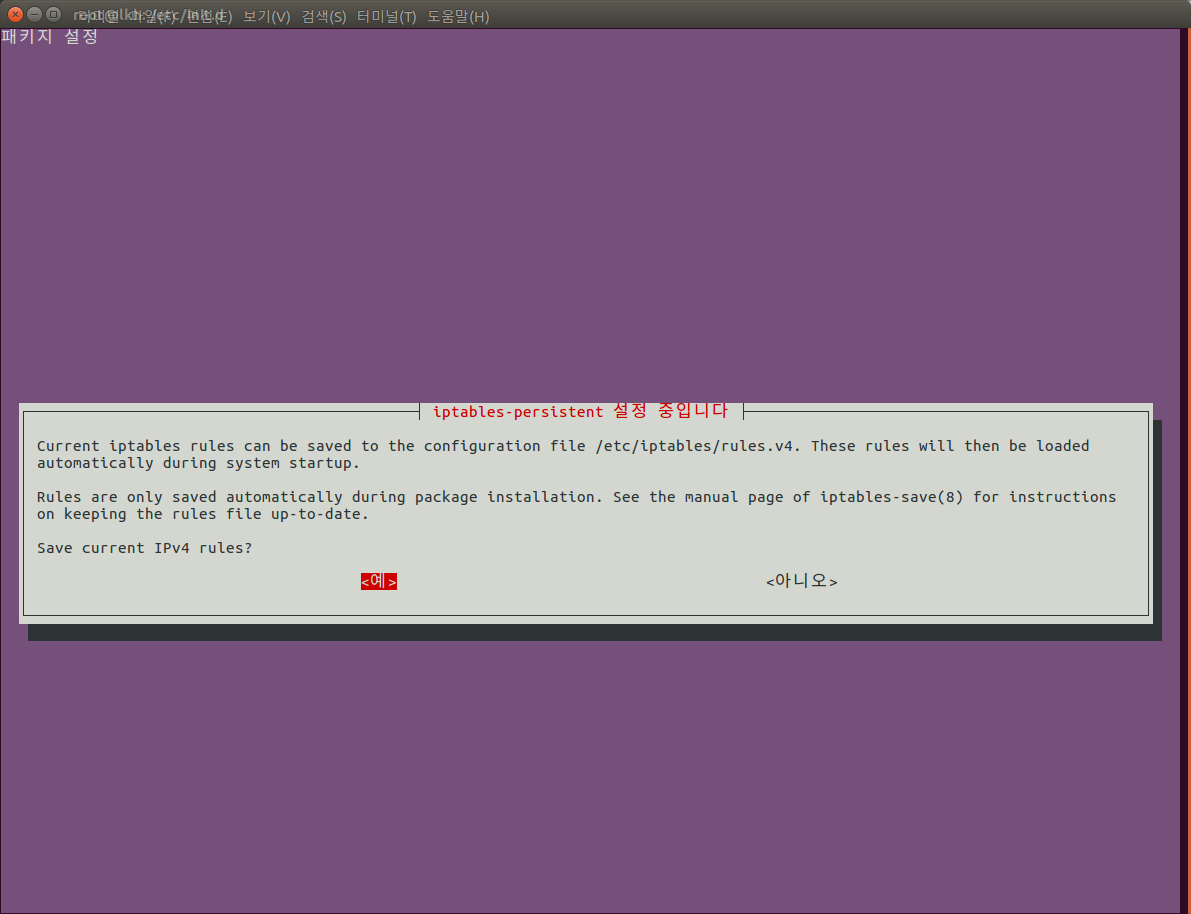
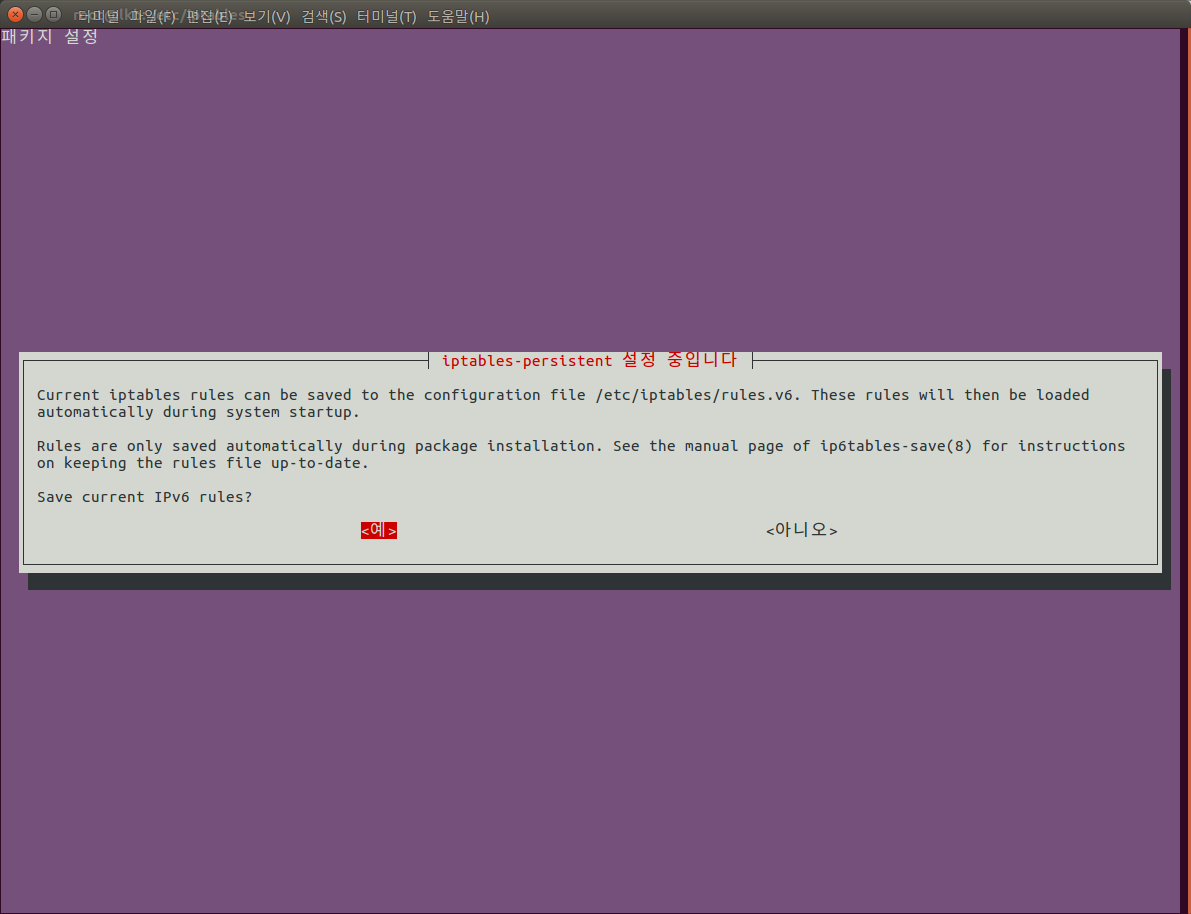
$ sudo apt-get install iptables-persistent
:: ipv4 / ipv6 룰 저장여부


설정파일 저장경로 
$ pwd
/etc/iptables

:: 위에서 저장을 했다면 아래와 같이 현재 Rule 파일로 저장
$ ls -l
합계 8
-rw-r--r-- 1 root root 1353  9월 20 13:27 rules.v4
-rw-r--r-- 1 root root  187  9월 20 13:27 rules.v6


방법1) init 스크립트 작성
$ sudo service iptables-persistent start

:: invoce-rc.d 를 이용해서 서비스 실행
$ sudo  invoke-rc.d netfilter-persistent save
 * Saving netfilter rules...                                                                  
run-parts: executing /usr/share/netfilter-persistent/plugins.d/15-ip4tables save
run-parts: executing /usr/share/netfilter-persistent/plugins.d/25-ip6tables save
                                                                                        [ OK ]

$ sudo service netfilter-persistent stop

:: init 스크립트로 복사 
$ sudo cp /usr/share/netfilter-persistent/plugins.d/15-ip4tables /etc/init.d/iptables
$ sudo /etc/init.d/iptables start
$ sudo /etc/init.d/iptables flush

:: 부팅시 자동으로 서비스 올라오게 등록
$ sudo update-rc.d -f iptables defaults


아래와 같은 에러가 뜨면... 해당스크립트에 LSB tag값이 지정되어있지 않다는 메세지기에 아래 문구삽입
$ sudo  update-rc.d -f iptables defaults
insserv: warning: script 'K01iptables' missing LSB tags and overrides
insserv: warning: script 'iptables' missing LSB tags and overrides


$ sudo vim /etc/init.d/iptables
............................
### BEGIN INIT INFO
# Provides:          skeleton
# Required-Start:    $remote_fs $syslog
# Required-Stop:     $remote_fs $syslog
# Default-Start:     2 3 4 5
# Default-Stop:      0 1 6
# Short-Description: Example initscript
# Description:       This file should be used to construct scripts to be
#                    placed in /etc/init.d.
### END INIT INFO

서비스 활성화 체크리스트
$ sudo service --status-all


방법2) 네트워크 설정파일에 저장된 설정 파일 iptables-restore

$ sudo vim /etc/network/interface
auto eth0
iface eth0 inet static
        address 192.168.22.223
        netmask 255.255.255.0
        gateway 192.168.22.1
        dns-nameserver 115.68.62.210
        pre-up iptables-restore < /etc/iptables/rules.v4


[출처] 모지리닷컴 | 이경현 (http://www.mojily.com/bbs/board.php?bo_table=B19&wr_id=2831&page=0)

반응형

댓글()

APACHE 2.4 + PHP 5.5 + MYSQL 5.6 설치

리눅스/APACHE|2017. 1. 2. 11:07
반응형

설치 버전

  • apache-2.4.xx
  • php-5.5.xx
  • mysql-5.6.xx

MySQL 설치

Note : MySQL 소스컴파일 설치하는 과정에 대한 내용이며, 설치 버전은 mysql-5.6의 가장 최신 버전을 사용한다.

mysql user 생성

소스코드 다운로드
Download

다운받은 소스 파일 압축 해제

필요한 패키지 설치

Note : 설치에 앞서 필요한 패키지를 다운로드 한다.

설치

설정파일 복사

시작 스크립트 복사

Note : 부팅시 자동으로 시작 할 수 있게 하기 위해 init 스크립트를 /etc/rc.d/init.d/로 복사한다.

기본 데이터베이스 생성

데이터베이스 구동

root 패스워드 설정

OR


Apache 설치

Note : 다음은 Apache 소스컴파일 과정이며, 설치 버전은 apache-2.4의 가장 최신 버전을 사용한다.

필요한 패키지 설치

Note : 설치 패키지 내용은 시스템 환경 마다 다소 차이가 있을 수 있다.

apache 소스 압축 해제

아파치 소스에 apr 추가

Note : apr 소스 복사 기존 httpd-2.2 소스에는 aprapr-util 이 포함되 어있었는데 2.4 버전에서 부터는 포함이 되어 있지 않아 수동으로 포함 시켜줘야 하는 번거로움이 있다.

컴파일

시작 스크립트 복사

구동 스크립트 복사후 아래 내용 추가

/etc/rc.d/init.d/httpd 파일의 최상단에 다음내용을 추가.

서비스 등록


PHP 설치

Note : 다음 내용은 PHP 소스컴파일 과정에 대한 내용이며, 설치 버전은 php-5.5의 가장 최신버전을 사용한다.

소스파일 압축 해제

필요한 패키지 설치

컴파일

Note : 컴파일 옵션은 그닥 별다른 사항은 없으나, mysql 연동하는 부분에서 mysqlnd를 사용했다.
mysqlnd를 사용한 이유는 기존 php mysql 연동시 mysql client library를 통해 연동을 했으나 mysql client library를 설치 하지 않아도 mysql 연동이 가능하고, php확장 모듈로 만들어졌기 때문에 php동작과 긴밀하게 연결되어 있어 메모리 관리 측면에서 효율적이다. 또한 mysqlnd는 여러기능의 플러그인을 지원한다.
mysqlnd에 대한 자세한 내용은 http://php.net/manual/kr/intro.mysqlnd.php에서 확인 가능하다.

환경설정 파일 복사

아파치 환경 설정

httpd.conf 파일에 다음 내용 추가 및 수정

연동 확인
/usr/local/apache/htdocs/info.php 파일을 만들어 아래 내용을 삽입 후 저장.

웹브라우져에서 http://ip-address/info.php 호출해 php information 페이지가 잘 출력되면 성공적으로 설치된 것이다.


[출처] https://blog.onlab.kr/2016/07/29/apache-2-4-php-5-5-mysql-5-6-%EC%84%A4%EC%B9%98/

반응형

댓글()

[OpenVAS] CentOS 7 에서 pdf 리포트가 0 byte 로 생성될 경우

리눅스/Security|2016. 12. 12. 16:02
반응형

# yum -y install texlive-changepage texlive-titlesec


# mkdir -p /usr/share/texlive/texmf-local/tex/latex/comment


# cd /usr/share/texlive/texmf-local/tex/latex/comment


# wget http://mirrors.ctan.org/macros/latex/contrib/comment/comment.sty 


# chmod 644 comment.sty


# texhash


[출처] http://miotramemoria.blogspot.jp/2014/08/centos-7-openvas-pdf-reports.html


잘 안되면 그냥 yum install texlive* textlive-* 로 전부 설치해버립니다. (경험)

반응형

댓글()

[OpenVAS] WARNING: Cannot connect to KB at '/tmp/redis.sock': Connection refused'

리눅스/Security|2016. 12. 12. 13:50
반응형

9392 포트로 접속하여 스캐닝 실행시 에러 출력이 아래와 같다면..


Install OpenVAS 7 On CentOS 7 – Run Vulnerability Assessments and Pen Tests


[root@localhost bin]# yum -y install redis


[root@localhost bin]# echo "unixsocket /tmp/redis.sock" >> /etc/redis.conf


[root@localhost bin]# sed -i 's/enforcing/disabled/g' /etc/selinux/config /etc/selinux/config


[root@localhost bin]# systemctl enable redis.service


Created symlink from /etc/systemd/system/multi-user.target.wants/redis.service to /usr/lib/systemd/system/redis.service.


[root@localhost bin]# reboot


[출처] Install OpenVAS 7 On CentOS 7 – Run Vulnerability Assessments and Pen Tests

반응형

댓글()

php 설치시 만나는 각종에러

리눅스/PHP|2016. 12. 12. 13:12
반응형

리눅스 APM 소스설치시 Error 및 해결 방법
APM 소스설치시 발생되는 몇가지 Error와 그 해결 방법이다.


1. Mysql


Error 1)
checking for termcap functions library... configure: error: No curses/termcap library found
make: *** No targets specified and no makefile found.  Stop.

해결 방법
# yum –y install libtermcap-devel ncurses-devel 설치


Error 2)
/bin/rm: cannot remove `libtoolT': No such file or directory 
해결 방법
mysql 소스파일 Directory에서 아래 진행
# autoreconf --force --install
# aclocal
# libtoolize --automake --force
# automake --force --add-missing


2. Apache
Error 1)
configure: error: ...No recognized SSL/TLS toolkit detected

해결 방법
# yum –y install openssl-devel


3. PHP
Error 1)
Checking for pkg-config... /usr/bin/pkg-config
configure: error: Cannot find OpenSSL's <evp.h>
해결 방법
# yum –y install openssl-devel


Error 2)
Configure: error: xml2-config not found. Please check your libxml2 installation.
해결 방법
# yum –y install libxml2-devel


Error 3)
Configure: error: Please reinstall the libcurl distribution -
easy.h should be in <curl-dir>/include/curl/
해결 방법
# yum –y install curl-devel


Error 4)
Configure: error: libpng.(also) not found.
해결 방법
# yum –y install libpng-devel


Error 5)
Configure: error: Please reinstall the BZip2 distribution
해결 방법
# yum –y install bzip2-devel


Error 6)
Configure: error: libjpeg.(also) not found.
해결 방법
# yum –y install libjpeg-devel


Error 7)
Checking for unixODBC support... configure: error: ODBC header file '/usr/include/sqlext.h' not found!
해결 방법
# yum –y install unixODBC-devel


Error 8)
configure: error: DBA: Could not find necessary header file(s).
해결 방법
# yum –y install gdbm-devel


Error 9)
Configure: error: Cannot find MySQL header files under /usr.
Note that the MySQL client library is not bundled anymore!
해결 방법
# yum –y install mysql-devel


Error 10)
Configure: error: freetype.h not found.
해결 방법
# yum –y install freetype-devel


Error 11)
Configure: error: Unable to locate gmp.h
해결 방법
# yum –y install gmp-devel


Error 12)
Configure: error: Cannot find pspell
해결 방법
# yum –y install pspell-devel


Error 13)
configure: error: not found. Please reinstall the expat distribution.
해결 방법
# yum –y install expat-devel


Error 14)
Configure: error: Please reinstall the ncurses distribution
해결 방법
# yum –y install ncurses-devel


Error 15)
Configure: error: snmp.h not found. Check your SNMP installation.
해결 방법
# yum –y install net-snmp-devel


반응형

댓글()

sshpass 사용법

리눅스/OS 일반|2016. 10. 11. 17:41
반응형

목차


1 개요


2 활용예시 1: sshpass + ssh (접속)


3 활용예시 2: sshpass + ssh (명령어 실행)


4 활용예시 3: sshpass + scp (파일 보내기)


5 참고 자료


활용예시 1: sshpass + ssh (접속)


명령어

sshpass -p패스워드 ssh -o StrictHostKeyChecking=no 아이디@호스트주소


실행예시

[root@zetawiki ~]# sshpass -pP@ssw0rd ssh -o StrictHostKeyChecking=no root@135.79.246.99

Warning: Permanently added '135.79.246.99' (RSA) to the list of known hosts.

Last login: Wed Nov 27 15:52:59 2013 from 135.79.246.80

[root@jmtest01 ~]#

→ 135.79.246.80(jmnote) → 135.79.246.99(jmtest01) 접속


활용예시 2: sshpass + ssh (명령어 실행)


명령어

sshpass -p패스워드 ssh -o StrictHostKeyChecking=no 아이디@호스트주소 명령어


실행예시

[root@zetawiki ~]# sshpass -pP@ssw0rd ssh -o StrictHostKeyChecking=no root@135.79.246.99 hostname

jmnote02

[root@zetawiki ~]#

→ 135.79.246.99에서 hostname 명령어가 실행되어 원격서버의 호스트명 jmnote02가 출력됨


활용예시 3: sshpass + scp (파일 보내기)


명령어

sshpass -p패스워드 scp -o StrictHostKeyChecking=no 로컬파일 아이디@호스트주소:/폴더/파일명


실행예시

[root@zetawiki ~]# sshpass -pP@ssw0rd scp -o StrictHostKeyChecking=no hello.txt root@135.79.246.99:/root/hello.txt

[root@zetawiki ~]# sshpass -pP@ssw0rd ssh -o StrictHostKeyChecking=no root@135.79.246.99

Last login: Wed Nov 27 15:56:26 2013 from 135.79.246.80

[root@jmtest01 ~]# ll hello.txt

-rw-r--r-- 1 root root 6 Nov 27 16:03 hello.txt

→ 135.79.246.80(jmnote)에서 135.79.246.99(jmtest01)로 hello.txt 복사


[출처] http://zetawiki.com/wiki/%EB%A6%AC%EB%88%85%EC%8A%A4_sshpass_%EC%82%AC%EC%9A%A9%EB%B2%95


내용 추가 ==============


1) 변수 이용

쉘스크립트에서 사용할 경우 변수 지정을 먼저 하고 가져다 쓰면 편리합니다.

server_cmd="sshpass -p1q2w3e4r ssh -o StrictHostKeyChecking=no root@192.168.10.2"


# $server_cmd df -h

Filesystem            Size  Used Avail Use% Mounted on

/dev/mapper/VolGroup00-LogVol00

                       19G  8.6G  8.8G  50% /

/dev/sda1              99M   41M   54M  43% /boot

tmpfs                 249M     0  249M   0% /dev/shm


2) ssh 포트가 기본 포트가 아닐경우
sshpass -p1q2w3e4r ssh -t -p220 -o StrictHostKeyChecking=no root@192.168.10.2

3) scp 와 특정 포트를 동시 사용

sshpass -p1q2w3e4r scp -P220 -o StrictHostKeychecking=no /root/crm/crm.log root@192.168.10.2:/root/


4) 여러줄의 명령을 보낼 경우

a.txt 에 아래 내용 넣은 후

touch 111

touch 222

아래와 같이 실행합니다.

cat a.txt |$server_cmd


-----------------------------


반응형

댓글()

우분투 ppa 관리 (리스트/추가/삭제)

리눅스/OS 일반|2016. 10. 10. 14:36
반응형

1. 리스트 확인

grep ^'deb ' /etc/apt/sources.list /etc/apt/sources.list.d/*.list


2. 추가

add-apt-repository ppa:PPA_NAME


3. 삭제

add-apt-repository --remove ppa:PPA_NAME


반응형

댓글()

우분투에 설치된 패키지 보는 3가지 명령

리눅스/OS 일반|2016. 10. 10. 14:35
반응형

# dpkg -l


# dpkg --get-selections | grep -v deinstall


# apt --installed list


반응형

댓글()

ubuntu 파일탐색기 추천 (Double Commander)

리눅스/OS 일반|2016. 10. 6. 11:15
반응형

xwindow 가 설치되어 있다면 기본 탐색기보다 좋은 (트리구조, 화면분할) 파일탐색기를 설치하세요.


# apt-get install doublecmd-gtk


반응형

댓글()

ubuntu 패키지 설치가 안될 경우 (계속 없다고 나오면)

리눅스/OS 일반|2016. 10. 5. 16:19
반응형

/etc/apt/source.list 파일을 아래 내용으로 바꾸어 보고 다시 실행해봅니다.


# deb cdrom:[Ubuntu-Server 14.04.2 LTS _Trusty Tahr_ - Release amd64 (20150218.1)]/ trusty main restricted


#deb cdrom:[Ubuntu-Server 14.04.2 LTS _Trusty Tahr_ - Release amd64 (20150218.1)]/ trusty main restricted


# See http://help.ubuntu.com/community/UpgradeNotes for how to upgrade to

# newer versions of the distribution.

deb http://us.archive.ubuntu.com/ubuntu/ trusty main restricted

deb-src http://us.archive.ubuntu.com/ubuntu/ trusty main restricted


## Major bug fix updates produced after the final release of the

## distribution.

deb http://us.archive.ubuntu.com/ubuntu/ trusty-updates main restricted

deb-src http://us.archive.ubuntu.com/ubuntu/ trusty-updates main restricted


## N.B. software from this repository is ENTIRELY UNSUPPORTED by the Ubuntu

## team. Also, please note that software in universe WILL NOT receive any

## review or updates from the Ubuntu security team.

deb http://us.archive.ubuntu.com/ubuntu/ trusty universe

deb-src http://us.archive.ubuntu.com/ubuntu/ trusty universe

deb http://us.archive.ubuntu.com/ubuntu/ trusty-updates universe

deb-src http://us.archive.ubuntu.com/ubuntu/ trusty-updates universe


## N.B. software from this repository is ENTIRELY UNSUPPORTED by the Ubuntu 

## team, and may not be under a free licence. Please satisfy yourself as to 

## your rights to use the software. Also, please note that software in 

## multiverse WILL NOT receive any review or updates from the Ubuntu

## security team.

deb http://us.archive.ubuntu.com/ubuntu/ trusty multiverse

deb-src http://us.archive.ubuntu.com/ubuntu/ trusty multiverse

deb http://us.archive.ubuntu.com/ubuntu/ trusty-updates multiverse

deb-src http://us.archive.ubuntu.com/ubuntu/ trusty-updates multiverse


## N.B. software from this repository may not have been tested as

## extensively as that contained in the main release, although it includes

## newer versions of some applications which may provide useful features.

## Also, please note that software in backports WILL NOT receive any review

## or updates from the Ubuntu security team.

deb http://us.archive.ubuntu.com/ubuntu/ trusty-backports main restricted universe multiverse

deb-src http://us.archive.ubuntu.com/ubuntu/ trusty-backports main restricted universe multiverse


deb http://security.ubuntu.com/ubuntu trusty-security main restricted

deb-src http://security.ubuntu.com/ubuntu trusty-security main restricted

deb http://security.ubuntu.com/ubuntu trusty-security universe

deb-src http://security.ubuntu.com/ubuntu trusty-security universe

deb http://security.ubuntu.com/ubuntu trusty-security multiverse

deb-src http://security.ubuntu.com/ubuntu trusty-security multiverse


## Uncomment the following two lines to add software from Canonical's

## 'partner' repository.

## This software is not part of Ubuntu, but is offered by Canonical and the

## respective vendors as a service to Ubuntu users.

# deb http://archive.canonical.com/ubuntu trusty partner

# deb-src http://archive.canonical.com/ubuntu trusty partner


## Uncomment the following two lines to add software from Ubuntu's

## 'extras' repository.

## This software is not part of Ubuntu, but is offered by third-party

## developers who want to ship their latest software.

# deb http://extras.ubuntu.com/ubuntu trusty main

# deb-src http://extras.ubuntu.com/ubuntu trusty main


반응형

댓글()